
Ever scanned a QR code and wondered what's actually inside that tiny square? You're not alone. QR codes are everywhere today — on restaurant tables, product labels, posters, and even TV ads. But most people have no idea how QR codes are generated. Understanding the process helps you make smarter decisions around design, scan reliability, and digital security. This guide breaks down how QR codes are generated in plain language.
What Is a QR Code?
A QR code — short for Quick Response code — is a two-dimensional barcode that stores data both horizontally and vertically. Unlike a traditional 1D barcode, a QR code can hold far more information in a smaller space.
Japanese company Denso Wave developed the technology in 1994 to track auto parts. Today, it connects printed materials to the digital world. One scan can open a website, share contact details, connect to Wi-Fi, or trigger a payment.
Here's what you can typically encode into a QR code:
• Website URLs and landing pages
• Contact information via vCard
• Wi-Fi credentials
• Phone numbers, SMS messages
• Social media profile links
• App download links
• Event tickets and payment data
How Are QR Codes Generated? The 5-Step Process
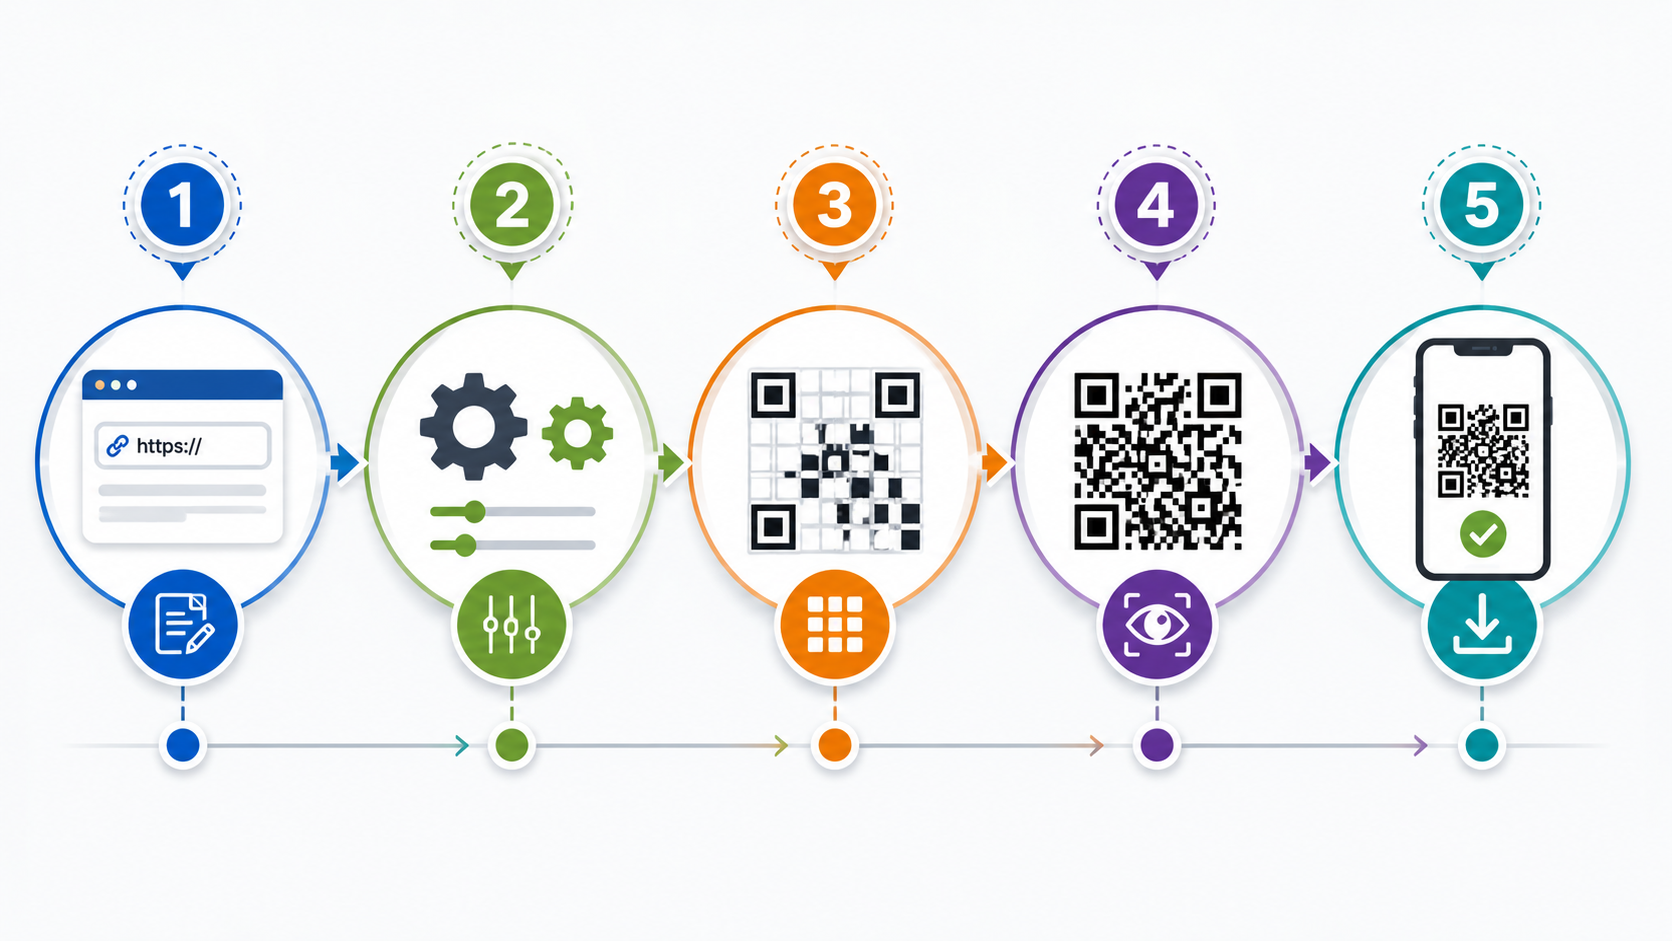
The QR code generation process follows strict ISO standards. Here's how it works — step by step:
Step 1: Data Analysis
The generator first examines your input and selects the most efficient encoding mode. There are four options: numeric, alphanumeric, byte, and kanji. Simpler data results in a smaller, cleaner QR code. As content complexity increases, so does the density of the final image.
Step 2: Binary Conversion
Your URL or text is converted into a binary string — a sequence of 1s and 0s. This binary data forms the raw foundation of your QR code.
Step 3: Error Correction (Reed-Solomon)
This is where QR codes get clever. The generator adds redundant data using the Reed-Solomon algorithm. This allows the code to remain scannable even if part of it is dirty, torn, or covered. There are four error correction levels:
Level | Data Recovery | Best Use |
L (Low) | Up to 7% | Clean environments, digital screens |
M (Medium) | Up to 15% | General print use |
Q (Quartile) | Up to 25% | Industrial, logo placement |
H (High) | Up to 30% | Harsh conditions, heavy branding |
Higher error correction lets you safely add a logo in the center of the code and use custom colors without breaking scannability.
Step 4: Module Placement
The binary bits are placed into a grid matrix in a precise zig-zag pattern. The generator reserves specific zones for functional patterns that help scanners understand the code's orientation and boundaries.
Step 5: Masking
Finally, a mask pattern is applied to the grid. This breaks up large blocks of identical colors that might confuse a scanner. The right mask ensures that any camera or barcode reader can decode the pattern quickly and accurately.
Key Components Inside Every QR Code
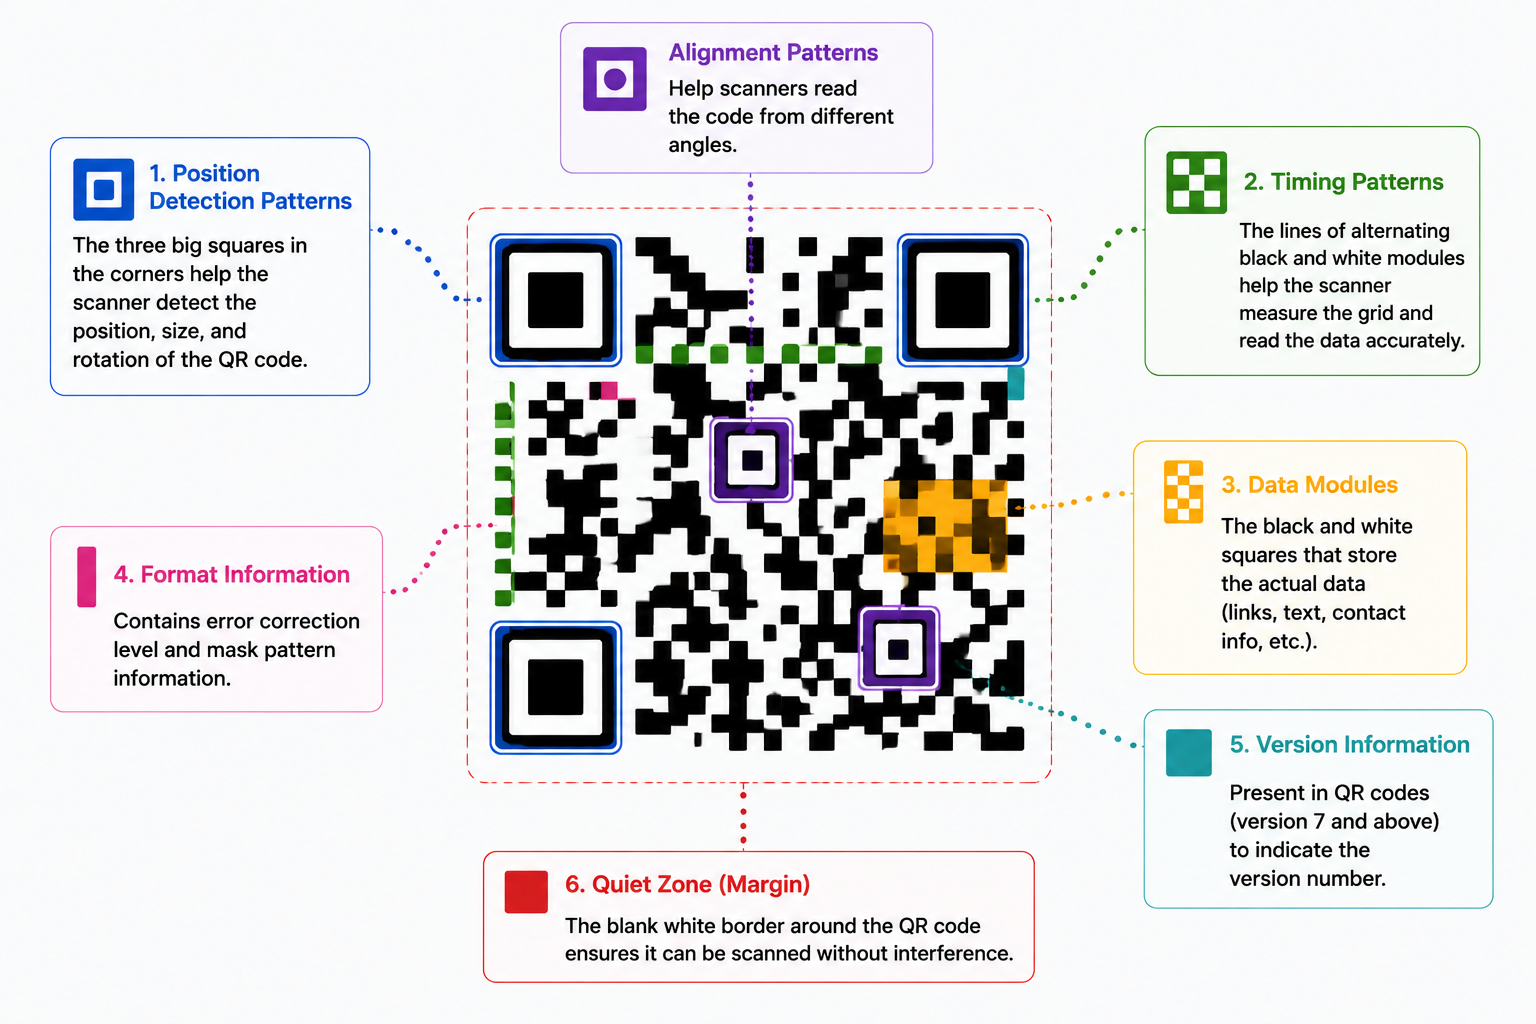
Every QR code contains several functional zones:
• Position markers — The three large squares in the corners help scanners find the code and read it from any direction.
• Alignment patterns — Smaller squares that correct for distortion on curved surfaces.
• Timing patterns — Alternating lines that define the data grid size.
• Error correction blocks — Redundant data that keeps the code scannable even if up to 30% is damaged.
• Format information — Defines the error correction level and mask pattern.
• Quiet zone — The white border around the code that separates it from surrounding design.
Static vs. Dynamic QR Codes: What's the Difference?
Before you generate a QR code, you need to pick a type. This choice matters more than most people realize.
Static QR Codes
Static QR codes embed your data directly into the pattern. Once created, the destination can't be changed. They work well for permanent information, like a home Wi-Fi password or fixed contact details. But they offer no tracking and no flexibility.
Dynamic QR Codes
Dynamic QR codes store a short redirect URL instead of the final destination. You can edit the linked content any time without reprinting the code. They also provide scan analytics — showing how many people scanned, when, where, and from which device.
For businesses, dynamic QR codes are the smarter choice for every campaign.
Best Practices Before You Generate a QR Code
• Always use dynamic QR codes for marketing materials — you'll thank yourself later.
• Use dark modules on a light background for maximum contrast and scan reliability.
• Keep a clear quiet zone — never crowd the code with other design elements.
• Download as SVG for large-format printing; use PNG for digital use.
• Always include a call-to-action like 'Scan for 10% off' near the code.
• Test your code on both iOS and Android before publishing or printing.
Common Mistakes to Avoid
• Using too low a contrast (e.g., light gray on white) — always go high contrast.
• Making the code too small — minimum 2.5 cm x 2.5 cm for print.
• Placing a logo that covers too much of the code — keep it under 30% of the total area.
• Skipping the test scan — always verify on a real device before going live.
• Using static codes on printed packaging where updates might be needed.
Conclusion
Understanding how QR codes are generated helps you create smarter, more reliable codes for your campaigns. The process converts your content into binary data, applies error correction, and assembles it into a standardized matrix — all handled automatically by modern QR code generators. Whether you're printing on a business card or a billboard, knowing what's inside the code helps you make better design and strategy decisions.
Ready to generate your first QR code? Start with a dynamic code, test it on multiple devices, and give your audience a clear reason to scan it.